DogFence Troubleshooting Guide
In the unlikely event that your Dog fence stops working please follow the procedures set out below. If these do not solve your problem, please call us and we will be happy to help you.
First things First:
If the dog is escaping and you think there may be a collar problem, firstly check the collar fit. If the collar is not tight enough the contacts will not be in touch with the dogs skin and therefore he will not feel any correction; rendering the system useless.
To check the collar fit follow these instructions: Encourage your dog to look up to the ceiling so his neck is completely stretched up, place your finger between the contact posts and the dog’s neck – you should only be able to get one finger between them and be good pressure on your finger. Any more than that and the collar is too loose and needs tightening.
Testing the Dog Fence Collar function and Changing the Training Levels:
Ensure you have your tester (star shaped object) and your collar to hand, this enables you to do all the tests necessary with the collar.
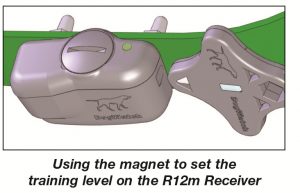
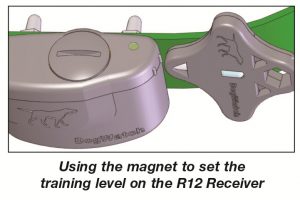
Firstly make sure the collar is drawing power from the battery, to do this you need to locate the test point on the collar. For the mini collars (R7m or R12m) there will be a small ‘D’ shaped indent on the right hand side of the collar & for the large collars (R9 or R12) there will be 2 raised lines located in the same place. Now using the tester place the magnet end (silver tip) to the test point on the collar – you should hear a number of beeps. This indicates the level the collar is on (1 beep=level 1; 2 beeps=level2; etc.) through to level 4 on the R12 & R12m and up to level 7 on the R9 & R7m. The long beep indicates the shock is turned off and the collar is set to audible only. To change the training level on the collar all you need to do is hold the magnet in place, the collar will run through all the levels continuously until the magnet is removed.
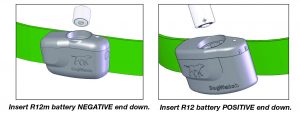
If the collar is not beeping through the levels this means there is a battery issue. Ensure the battery is put in the correct way: 3.0v battery for the mini collars needs to be + end up & 3.6v battery for the standard collars need to be + end down. Make sure the battery cap is on securely and re-test the collar with the tester. If it still doesn’t work put a new battery in the collar, which can be ordered from our shop.
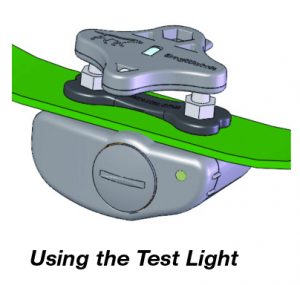
If the collar is beeping through the levels then move on to testing the shock is working correctly; to do this you need to take the collar and tester to the DogFence transmitter box (white or grey box plugged into the mains). Hold the tester over the contact posts of the collar – there is 2 holes in the tester with a silver wire running through them. With the tester and collar touching, hold them up to the transmitter panel. If the collar is working correctly you should hear the audible warning (beeping) from the collar; the light on the tester should also flash amber, indicating the shock is working correctly.
If the collar does not beep or the light on the tester doesn’t activate there could be a fault within the collar – you may be covered under our warranty so give us a call to organise a repair or replacement.
Testing the Transmitter
- Firstly check the green loop light and red power light are both on;
- If the green light is not on the box should be alarming at you indicating a break in the boundary cable.
- If both lights are on but the system isn’t working, pull the loop plug out – the green light should go out and the alarming should start (indication the loop has been broken). The red light should stay on. If no alarming this could indicate a lightning strike has broken the transmitter.
- If the red light isn’t on at all – ensure the system is plugged in and the socket is working. Also make sure the transmitter is switched on.
- If all working okay, adjust the range located on the right hand side of the panel. Turn the dial ¼ turn clockwise and repeat the collar tests above.
- If the collar still doesn’t respond after all the transmitter tests have been done; take the transmitter off the wall by nudging it upwards and off the screws. There are 4 tiny dipswitches in the back of the box – these should all be in the ‘up’ position. If they aren’t all up, switch them up and restart the transmitter by turning it off and on again – then retest the collars.
Short Loop Test
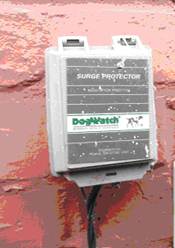
This tests whether there is a break in the boundary cable or a problem with the cables connecting the surge protector to the transmitter or indeed the transmitter itself. Firstly locate the surge protector which is usually on the outside wall of the building in which the transmitter is located.
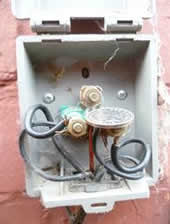
Open the surge protector by lifting the flap upwards, inside there is three copper screws; Place a screwdriver or coin across the bottom two screws in the surge protection box (this will create a mini loop between your transmitter and the surge protection and eliminate the boundary cable). Leave the bridge across the terminals and take the collar and collar tester and repeat the test at the transmitter panel as previously done. If the collar responds then you have a break/partial break in your boundary and you will need to locate the break.
Please note if you have a beeping noise before carrying out this test and the green light is not showing on the transmitter this test will confirm that your cable is broken – when placing the bridge across the surge protector the green light should illuminate and the beeping should stop (a loop has been formed between the transmitter and the surge protector – when you remove the coin the beeping will start again as the loop has been broken).
Re-joining the cable.
If you have successfully located the break in the boundary cable then you need to re-join the cable using the yellow or grey splice nuts left by the installer. NEVER EVER join the wire using tape, electrical splices – only use the authorised splices (these are filled with silicone) and will give the splice a waterproof seal. Follow the video below to learn how to use the splice nuts.
Still Having Problems?
If you have carried out all of the above and your collar/s are still not responding you may have a break or partial break in your boundary cable or a taped joint on the boundary wire. Partial breaks often occur when a previous wire break was fixed with electrical tape, or when the wire corrodes or degrades. Electrical tape works as a quick temporary fix for a wire break, but not long-term – over time it will allow water to corrode the wire, if this occurs the cable will need to be replaced. To fix a wire break always use the grey connectors supplied by DogFence. These splices will safely and permanently fix wire breaks. A short loop test above will determine whether there is a partial break as the collars will work when the bridge across the terminals is formed, but not otherwise.
If you have followed all the above tests and your collar is still not responding please contact us. If you have a break or partial break on your system we can offer a break finding tool for hire or a service call to trace and repair the break – 01628 476475.
With proper training and fully functioning equipment, dogs rarely, if ever escape. If you continue to have problems after taking these steps, contact us for refresher training for your dog.
Handy Tips to Keep your System Running
Know where your wire is buried
Use the training flags or some markers to define the edge of signal fields around the property before any landscaping is done. You can locate your fence by using the receiver collar. This will help any workmen to identify the approximate location of the boundary wire. Remember if you have been recently installed and the training flags are still in place that the flags are marking the edge of the signal field and not the location of the cable. Do not throw your training flags away after training.
Hold the receiver at the dog’s neck height (at your knees) and hold the receiver with the contact posts up. Walk perpendicular toward the boundary wire. You will first hear the audible tone – This will stop when you are directly over the wire. You will now hear the correction beeps and you can set your flag in the ground. This would also be applicable if you are placing the flags in the ground for the training of a new dog or cat.
Check your receiver collar
Test your collar monthly, also check the collar fit & check contact posts and the battery cap on the receiver collar and tighten if needed. It is also a good idea to check the lights on the transmitter occasionally. Remember – the red light shows you have AC power to the system, green light shows there are no breaks in the wire. If you have a wire break, the green light will go out an audible warning will sound.
If both lights go out, you may have experienced a lightning surge. If you still experience problems, please contact us for assistance – 01628 476475 or email: info@dogfence.co.uk
Test the Battery
Ensure you change the battery regularly – We offer battery programmes for all DogFence collars. If you join the DogFence battery programme you can have new batteries sent to you automatically, just when you need them! – When your battery runs out guess who else runs out!

